Choosing the best battery sump pump begins with risk, not marketing language. A wet basement can ruin flooring, stored furniture, electrical equipment, and family records within hours. FEMA estimates that one inch of floodwater can cause about $25,000 in property damage. The Insurance Information Institute also reports that water damage and freezing represent nearly one-quarter of homeowners insurance claims. These figures make backup pumping a practical resilience decision.
Richard Trethewey, a licensed master plumber and longtime This Old House plumbing expert, has described a sump pump as “insurance for your basement.” The comparison is useful, but incomplete. A battery sump pump still depends on a charged battery, a working check valve, and a discharge pipe that stays clear. It cannot correct poor drainage or a failed primary pump.
This guide examines capacity, battery chemistry, runtime, alarm systems, installation space, and maintenance access. It also considers real basement conditions, such as a narrow pit, frequent power outages, and sudden spring storms. A higher gallons-per-hour rating may look impressive. However, performance changes with discharge height and pipe length. That detail is easy to miss. It should not be.
Some recommendations will remain imperfect. No single battery sump pump fits every home, climate, or budget. A model that protects a finished basement may be excessive for a small crawl space. Reliable selection requires measured pump demand, realistic outage planning, and honest inspection of existing equipment. The safest choice is usually the one homeowners can test, understand, and maintain before the next storm arrives.
Choosing the best battery sump pump starts with an honest estimate of incoming water. A pump cannot protect a basement if its rated output ignores real conditions. Measure the inflow during heavy rain, snowmelt, or a controlled hose test. Mark the water level before testing. Then measure the rise from the pump inlet to the discharge outlet.
Measure the water first.
At 10 feet of total head, target approximately 1,500–2,500 gallons per hour. This range gives useful protection for many residential basements. However, pipe length, elbows, check valves, and narrow fittings reduce actual flow. A pump rated for 2,500 GPH at zero head may deliver much less at 10 feet. Check the performance curve, not only the largest number on the box. My first estimate once ignored a long discharge run. The result was slower drainage than expected.
Run a practical bucket test if possible. Time how long the backup system takes to move a measured volume through the installed discharge line. Repeat the test with the battery partly discharged, because performance can change. Select a battery with enough capacity for the likely outage duration, not merely enough power to start the pump. Record the pump’s running current and compare it with the battery’s usable amp-hours. Leave a safety margin for colder conditions, aging, and imperfect measurements. Real basements are rarely as predictable as test conditions.
Measure the basement inflow during heavy water conditions, then select a battery backup pump that can deliver approximately 1,500–2,500 gallons per hour at a 10-foot discharge head.
In this comparison, the 1,500–2,500 GPH range represents a practical target for many residential backup applications at 10 feet of lift. If measured inflow exceeds the selected pump capacity, consider a higher-capacity system or a second backup pump.
A pump curve matters more than a headline GPH number. A model rated at 2,000 GPH may deliver only 900 GPH at 10 feet of total head. That difference can decide whether water reaches the discharge point during a storm. Add vertical lift, elbows, check-valve resistance, and hose friction when estimating head height. Use the curve’s operating point, not its maximum value. Hydraulic Institute guidance emphasizes testing pump performance under defined flow and head conditions, which makes curve data more useful than advertising claims.
Power selection also affects runtime. A 12V pump may suit short backup cycles and smaller batteries. A 24V system usually reduces current for the same wattage, potentially lowering cable losses over longer runs. Check the battery’s usable amp-hours, not only its label. Runtime roughly equals usable watt-hours divided by pump watts. Field measurements are better. Measure current while the pump lifts real water. Laboratory curves cannot capture every installation mistake. That matters.
Efficiency deserves attention. The U.S. Department of Energy’s Improving Pumping System Performance sourcebook identifies pumping as a major industrial electricity load, often near 25% of facility electricity use. A sump pump is smaller, but the principle remains: wasted power becomes shorter backup time. Compare hydraulic efficiency, standby consumption, and flow at your actual head. A simple test with a marked container and stopwatch can expose optimistic assumptions. It may feel imprecise, yet ignoring real friction is worse.
Choosing a battery sump pump starts with the real electrical load, not the label. A 12V 100Ah battery stores 1,200 watt-hours nominally. However, lead-acid capacity is commonly rated at a 20-hour discharge rate under IEC battery testing practices. Faster discharge can reduce usable capacity.
The U.S. Department of Energy’s energy storage assessments commonly place lead-acid round-trip efficiency near 80–85%. Using 80% as a practical estimate gives about 960 usable watt-hours.
A 100-watt pump could therefore run for roughly 9.6 hours continuously. At 300 watts, runtime falls to about 3.2 hours.
An inverter adds losses, and motor starting surge may briefly exceed running power.
Measure it. Use a watt meter while the pump starts, runs, and shuts off. Record the highest starting load and the average running load.
A sump pump may operate only 10–30% of the time during moderate flooding, extending emergency coverage. Still, that assumption can fail during heavy rain.
Cold temperatures, battery age, cable resistance, and frequent cycling also reduce performance. Leave reserve capacity, and test the complete float-switch system before trusting it overnight.
A battery sump pump needs more than a strong motor. Its controls must react before water reaches the floor. Test the float switch by lifting it slowly in the pit. The pump should start without sticking, grinding, or repeated cycling. A second float can provide backup protection, but only if it moves freely. Small details matter.
The alarm should be loud enough to hear from an occupied room, even during a storm. Choose a system with a high-water alarm, low-battery warning, and charger fault alert.
The Insurance Information Institute reported that water damage and freezing caused 21.5% of homeowners insurance claims from 2017 to 2021. The average claim cost was $12,514. That makes a silent alarm an expensive weakness.
Check for certification to UL 778, the safety standard for motor-operated water pumps. Confirm the exact model and certification mark through an independent certification directory. UL 778 addresses electrical construction, insulation, grounding, and operating safety. It does not prove that every installation will perform perfectly. The pit size, battery condition, discharge pipe, and check valve still matter.
I recheck these parts before each storm. My checklist is not flawless. A monthly test is better than confidence based on appearance. Replace a weak battery before its rated service life ends if testing shows reduced runtime.
Keep the alarm audible.
Keep the switch clear.
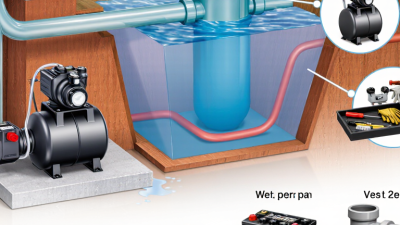
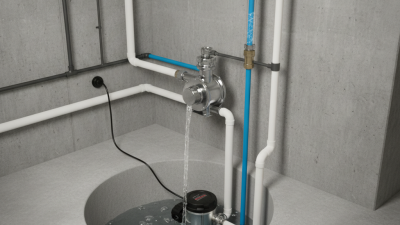
Choosing the best battery sump pump starts with planning the discharge route. The pump cannot protect a basement if water returns through a poor outlet. Measure the pipe run before installation. Keep the discharge line as short and straight as possible. Use properly sized, rigid piping where practical. Flexible hose may kink or sag, especially in cold spaces.
Direct water well away from the foundation. A suitable outlet should not drain beside the house, across a walkway, or toward a neighboring property. Check local plumbing requirements and the pump manufacturer’s instructions before cutting pipe. Install a check valve in the correct flow direction. Secure the pipe near joints and bends. Small installation details matter.
Testing should happen every month, not only during storms. Pour several buckets of clean water into the pit and watch the float activate the pump. Confirm that water leaves the property and does not leak at connections. Listen for grinding, slow discharge, or repeated cycling. Test the battery condition, alarm, and backup power indicator as well. Record the date and any unusual sound.
I used to focus only on whether the pump started. That was incomplete. A pump can run while its outlet is blocked. Monthly testing exposes problems early, although one test cannot guarantee performance during a long outage. Inspect the pit after heavy rain and replace damaged piping promptly.